Removing the flue baffles on Harmon Advance stoves means taking out metal plates that help guide hot air inside the stove. You turn two swing latches, lift off the covers, then gently lift and clean the baffles before putting them back.
These next lines tell you what’s coming up, Why and when you should remove the flue baffles on Harmon Advance. A simple, step-by-step guide for safe removal and reinstallation
What Are Flue Baffles?
Flue baffles are flat pieces of metal inside your Harmon Advance pellet stove. They help the stove’s heat move the right way before it goes up the chimney. Think of them like little doors that slow down hot air so the stove warms your room better.
When ash or soot builds up on these baffles, the stove can’t work its best. That’s why removing the flue baffles on Harmon Advance now and then is very important. Keeping them clean helps your stove stay cozy and safe.
Why Removing the Flue Baffles on Harmon Advance Matters?
If too much ash and soot stick to the flue baffles, your stove can’t send heat out well. The metal parts get too hot, and the stove might use more pellets than it needs. By removing the flue baffles on Harmon Advance, you let air flow the right way again. This means:
- The stove uses less fuel.
- Your home stays warm with less fuss.
- The stove lasts longer because it isn’t working too hard.
Cleaning these baffles regularly is like brushing your teeth. If you skip it, small problems can grow big.
Tools You Need For Removing the Flue Baffles on Harmon Advance
Before you start removing the flue baffles on Harmon Advance, gather these things:
- A pair of heat-safe gloves (the stove parts can stay warm)
- A soft brush or cloth for wiping off ash
- A small shop vacuum (optional, for loose ash)
- A flashlight so you can see into the stove’s insides
Having these tools ready makes the job quick and safe. Lay them out on a table near your stove.
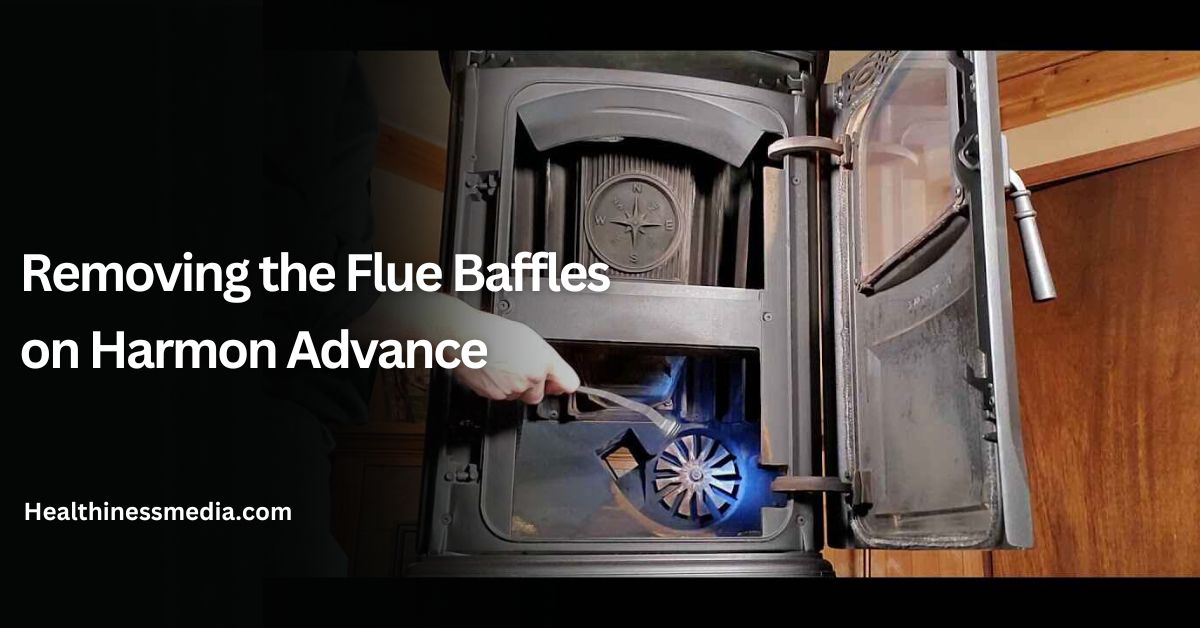
Step 1 – Remove the Heat Exchanger Channel Covers
- Let the stove cool completely. Never touch hot metal parts.
- Open the stove’s front door. You’ll see two metal covers above the fire pot.
- Locate the swing latches at the upper right and left of the baffles.
- Turn each latch about a quarter-turn until it unlocks.
- Lift the covers up and out. Use your gloves if parts feel warm.
With the covers off, you can see the flue baffles inside. You’ve finished the first step of removing the flue baffles on Harmon Advance.
Step 2 – Lift Out the Flue Baffles
Now that the channel covers are off, it’s time to take out the baffles:
- Look inside the stove where the metal plates sit.
- Reach in with gloved hands and grip a baffle’s edge.
- Gently lift straight up—the baffle should slide free.
- Set the baffle on a clean surface. Keep each one in order if they’re different sizes.
You’ve completed the key part of removing the flue baffles on Harmon Advance. Be sure to keep each baffle flat so it doesn’t bend.
Step 3 – Clean the Flue Baffles
Cleaning makes your stove work better:
- Use a soft brush or cloth to wipe ash and soot from each baffle.
- Vacuum loose ash from around the stove’s flue and blower wheel.
- Check for damage. If a baffle is bent or cracked, it may need replacement.
Clean baffles help your stove send warm air into the room instead of wasting it up the chimney.
Step 4 – Reinstall the Flue Baffles
Putting everything back is the reverse of removal:
- Place each baffle back where it came from, lining up any hooks or tabs.
- Lower the heat exchanger channel covers into position.
- Turn the swing latches to lock the covers in place.
- Close the stove door and wipe any fingerprints off the glass.
Now you’ve finished removing the flue baffles on Harmon Advance and putting them back. Your stove is fresh and ready to keep you warm.
Removing the Flue Baffles on Harmon Advance: Safety Tips
- Always wait until the stove is cool—at least an hour after it goes out.
- Wear gloves to protect your hands from sharp metal edges.
- Keep children and pets away while you work.
- Check your owner’s manual for any model-specific notes.
Following these rules helps make removing the flue baffles on Harmon Advance safe and easy.
Maintenance Tips To Removing the Flue Baffles on Harmon Advance
- Clean your stove monthly during heavy use (winter).
- Inspect baffles for damage each time you clean.
- Replace gaskets on covers if they look worn, so seals stay tight.
- Note the date of each cleaning in a log or calendar.
Good care keeps your stove happy and your family comfy all season.
Removing the Flue Baffles on Harmon Advance: When to Call a Technician
Some jobs need a pro’s touch:
- If a baffle is cracked or bent beyond repair.
- If you hear strange noises after reassembly.
- If the stove doesn’t fire up right or smokes too much.
A qualified pellet stove service technician can handle tougher fixes safely.
FAQs
How often should I remove the flue baffles on Harmon Advance?
Clean them every month when you’re using the stove.
Can I use water to clean the baffles?
No—water can cause rust. Stick to dry brushes or cloths.
What if my flue baffles are stuck?
Gently wiggle them. Never force them with a hard tool or you might bend the metal.
Do I need special parts?
Only if a baffle or latch is damaged. Replacement parts come from Harmon or your stove dealer.
Keeping It Working Well
After you’ve finished removing the flue baffles on Harmon Advance, enjoy better stove performance right away. The heat will flow more smoothly, and you’ll use less fuel. Remember, a clean stove is a happy stove!
By checking the baffles, covers, and seals regularly—just like brushing your teeth—you help your stove last for years. If you ever feel unsure, always ask a trusted pellet stove technician for help.
Stay warm, stay safe, and happy stove-cleaning!
